
Getting Patches Upstream
Published by Karl Fogel March 3, 2010 in Bug Tracking
We heard from Ubuntu maintainers and upstream developers that it was too easy to lose track of patches in bugs filed on Launchpad — or, put another way, that Launchpad wasn’t doing enough to bring patches to developers’ attention.
According to the Launchpad Upstream Improvements Spec that came out of a recent UDS:
Upstreams frequently complain that it is difficult for them to find Ubuntu patches. patches.ubuntu.com is a diff between Ubuntu and Debian, so it’s not really useful to some upstreams. We want an upstream patch report that shows patches in packages and their age, so we can act on them. …
To help solve this problem, we’ve added two new features to Launchpad.
1. The upstream report now shows bugs carrying patches.
The upstream report now shows the number of bugs carrying patches — see the rightmost column in this screenshot:
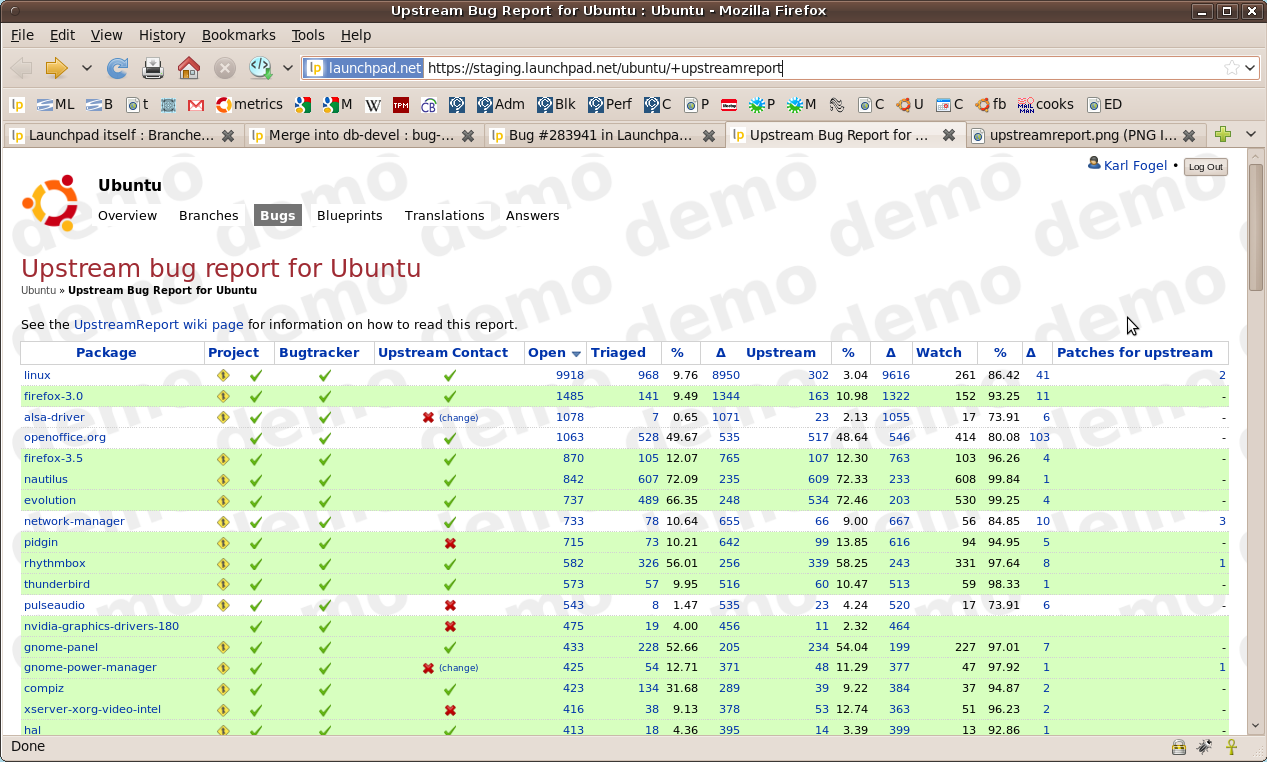
(click image to enlarge)
If you click on the number in that column, it brings you to a listing of the bugs with patches.
2. A new “patch report” is available wherever bugs are available.
The second feature is a new patch report available for projects, project groups, source packages, people, teams, distributions, and distroseries. It lists bugs that have patches attached — for those of you who’ve seen Bryce Harrington’s mockup, this is the same thing implemented directly in Launchpad.
The goal of the patch report is to make it easier for packagers and upstream developers to find patches that could be upstreamed, and, especially, to enable them to evaluate those patches quickly.
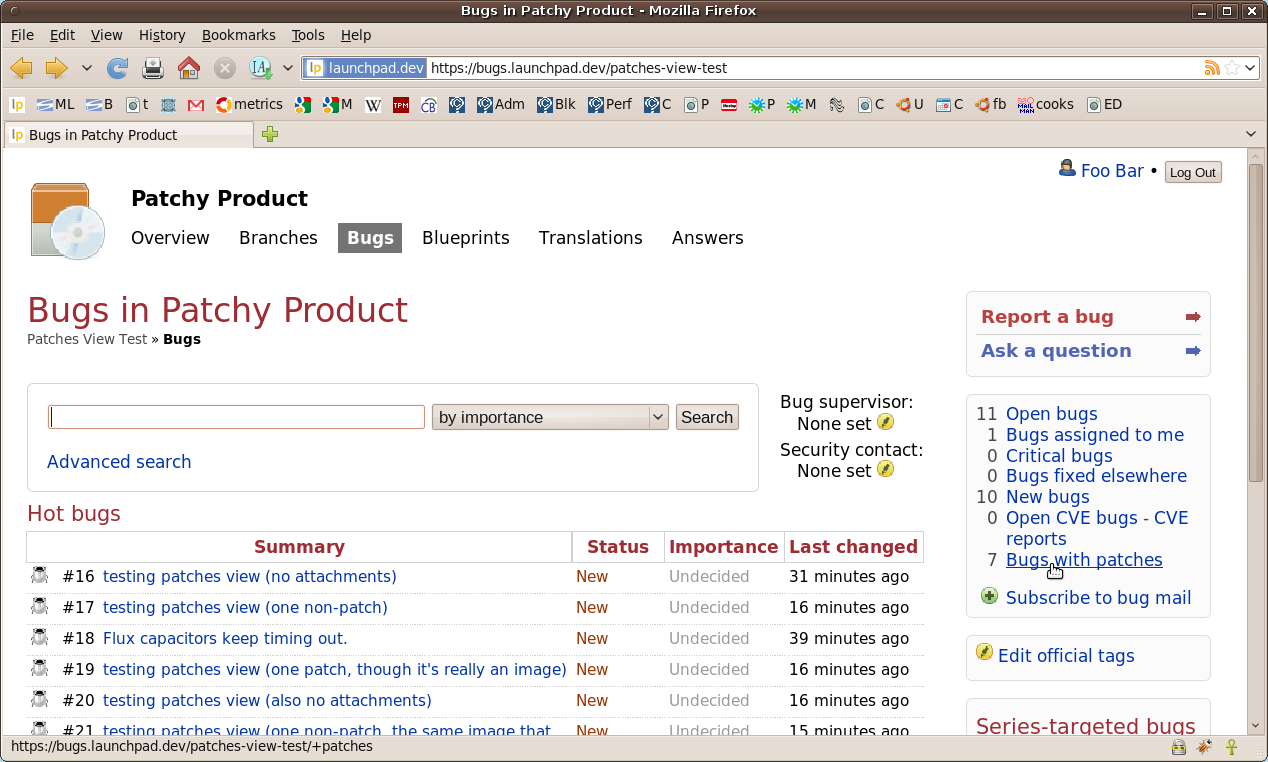
You can reach the patch report from a new link on any bugs page. On the project bugs page below, for example, see the link “7 bugs with patches” in the portlet on the right (and you can click on any of these screenshots to get a larger version):
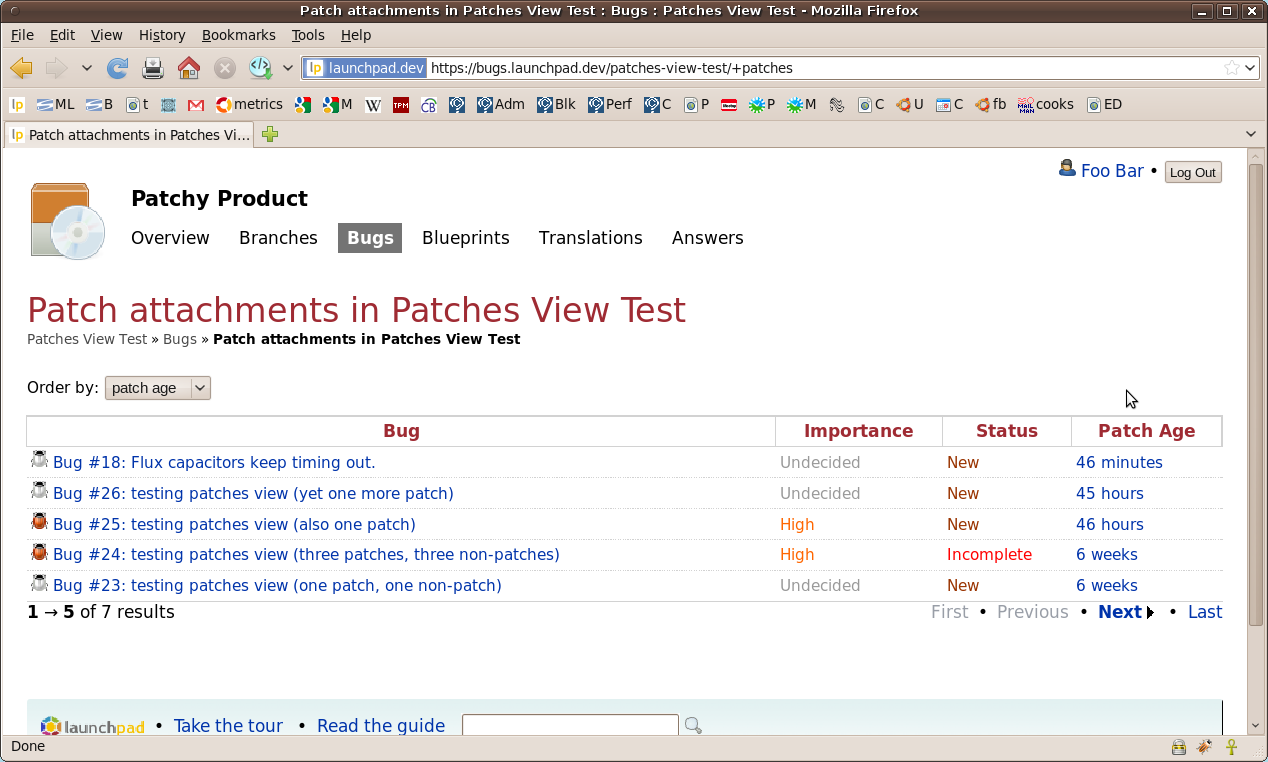
Clicking on the “7 bugs with patches” link appends “+patches” to the URL (hint, hint) which takes you to the corresponding patch report. There, patches are listed by bugtask, sorted by the age of the most recent patch in each bug, on the theory that new patches are probably more interesting than old ones:
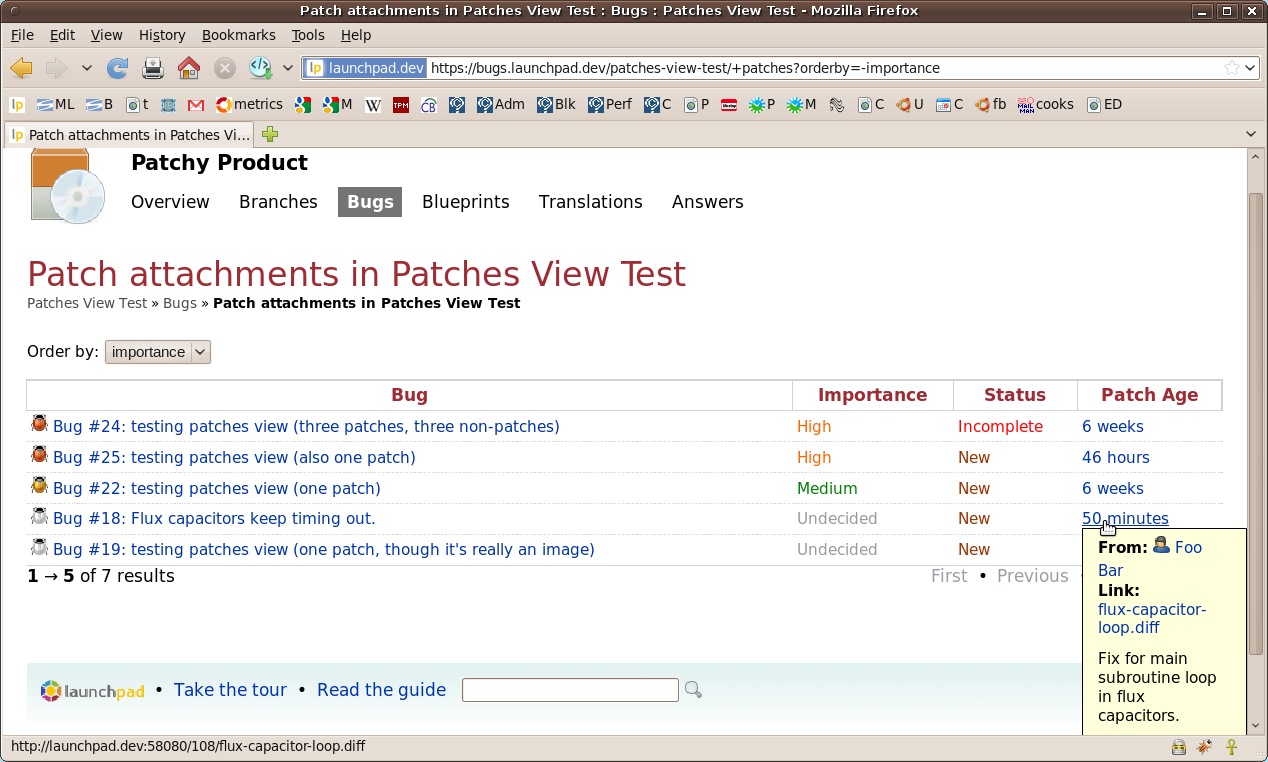
But you can sort by other things as well — say, by bugtask importance:
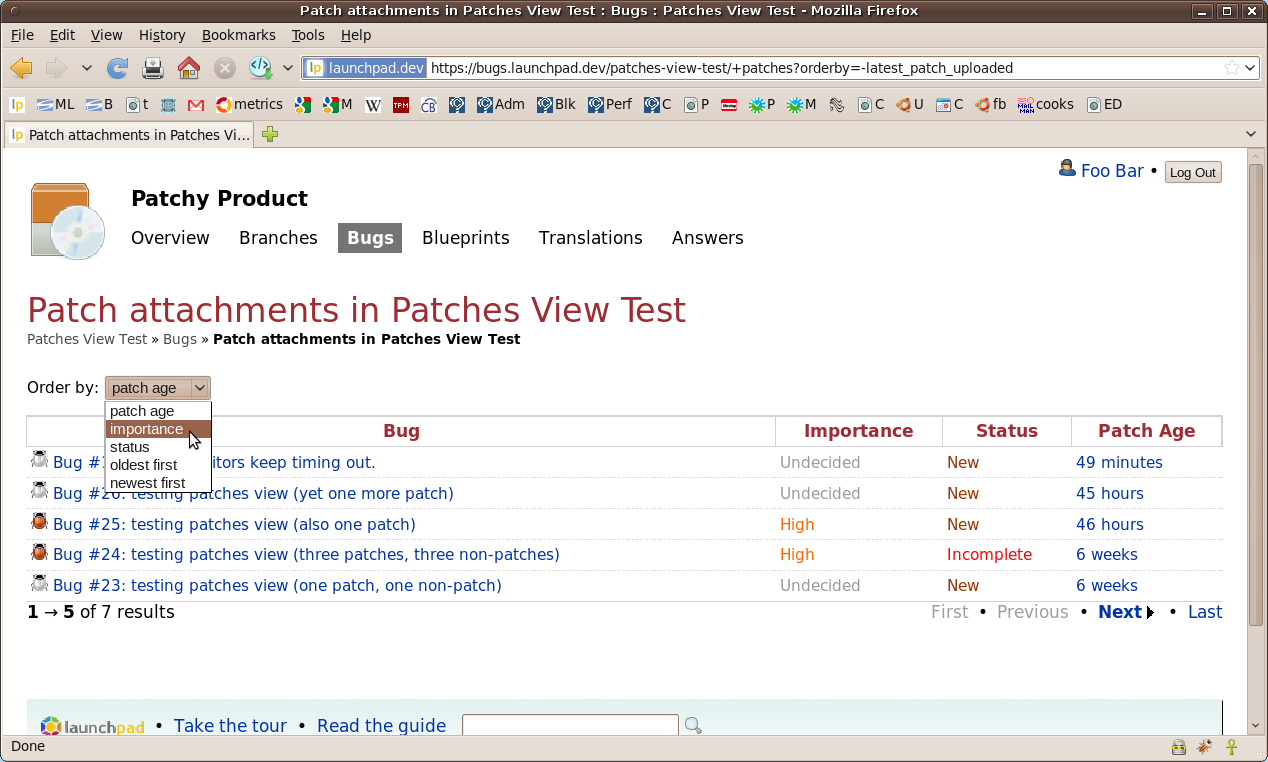
Sorting applies across all applicable patches, not just the ones that happen to be on the current page of a potentially multi-page list. Thus changing the sort order might change the set of bugs visible on the current page:

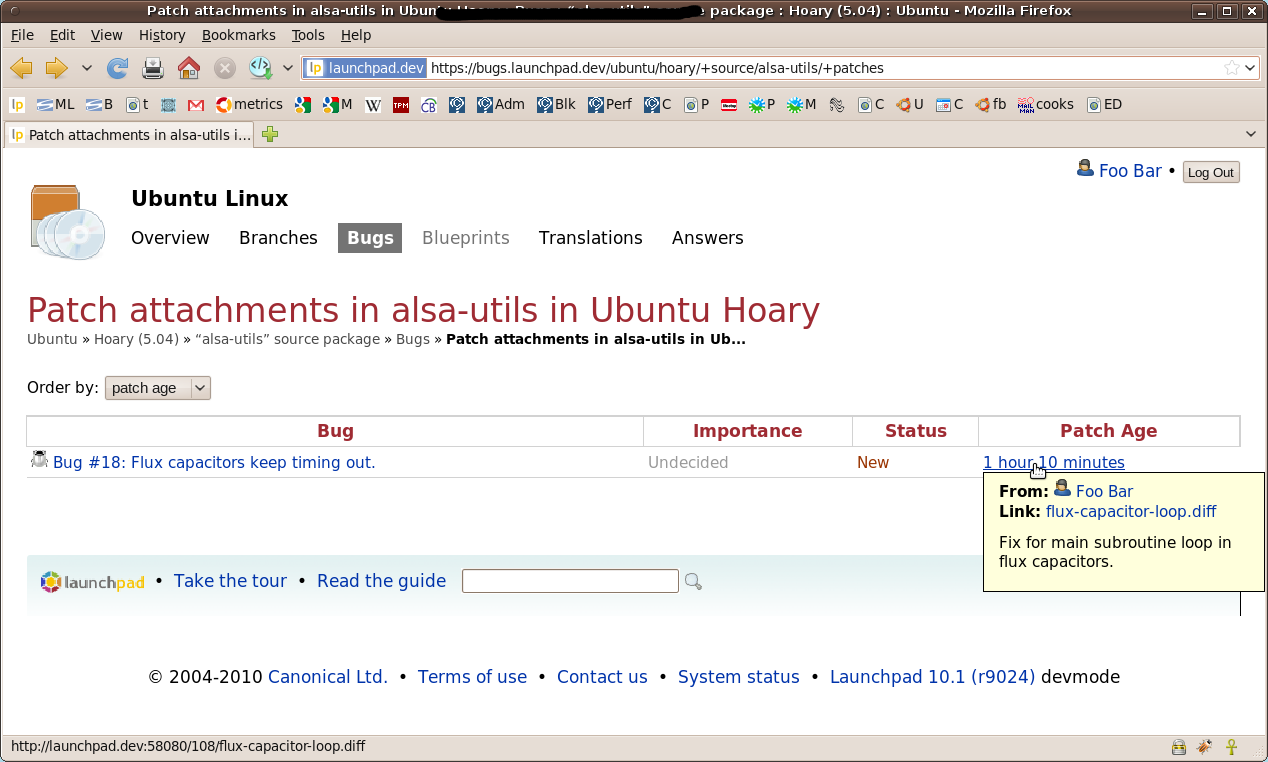
When you hover over a patch, a popup shows details about that patch (who uploaded it, the patch’s filename, and its attachment message):
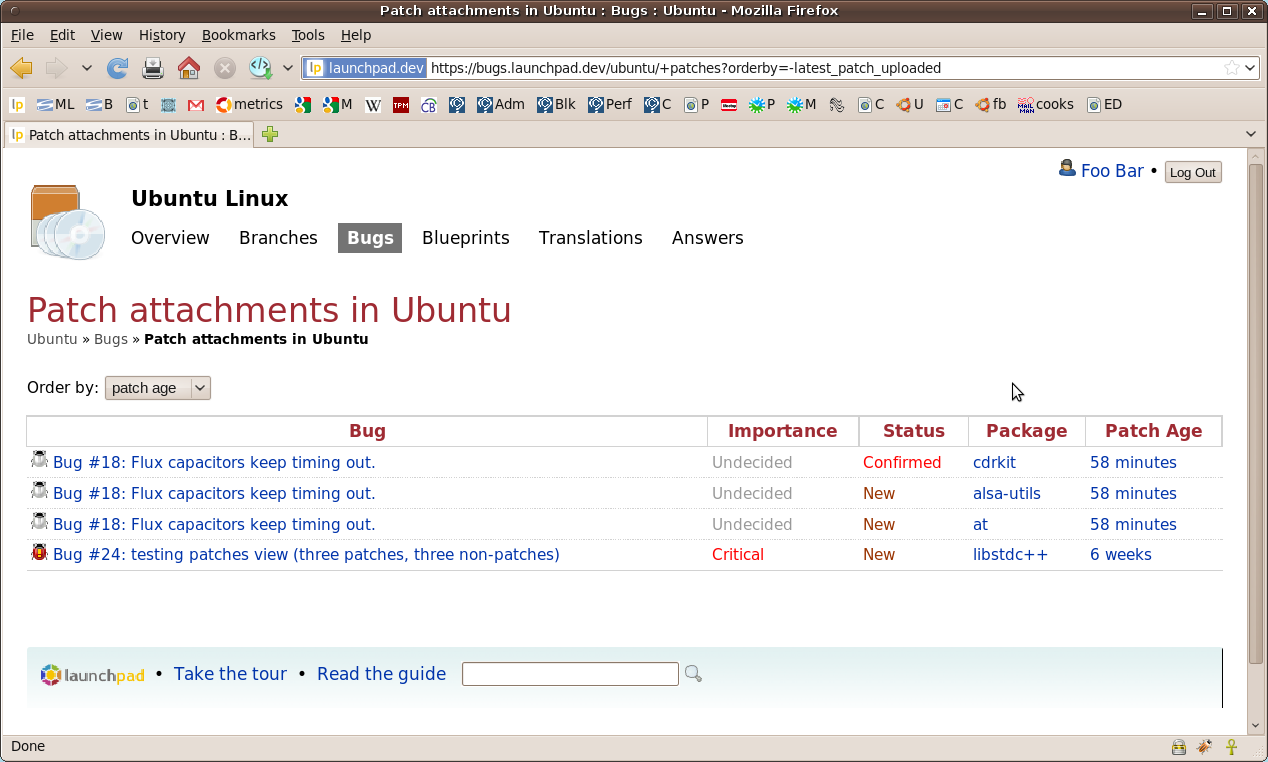
The patch report for entities like distributions and distroseries arranges patches by source package, since the same bug may have a different bugtask for each package, and each bugtask may have its own status, importance, etc:
You can also view the patch report on a particular source package:
Note that distroseries, persons, teams, and project groups all support this feature too. I didn’t include screenshots for them, to save space, but their patch reports can be reached in the expected way.
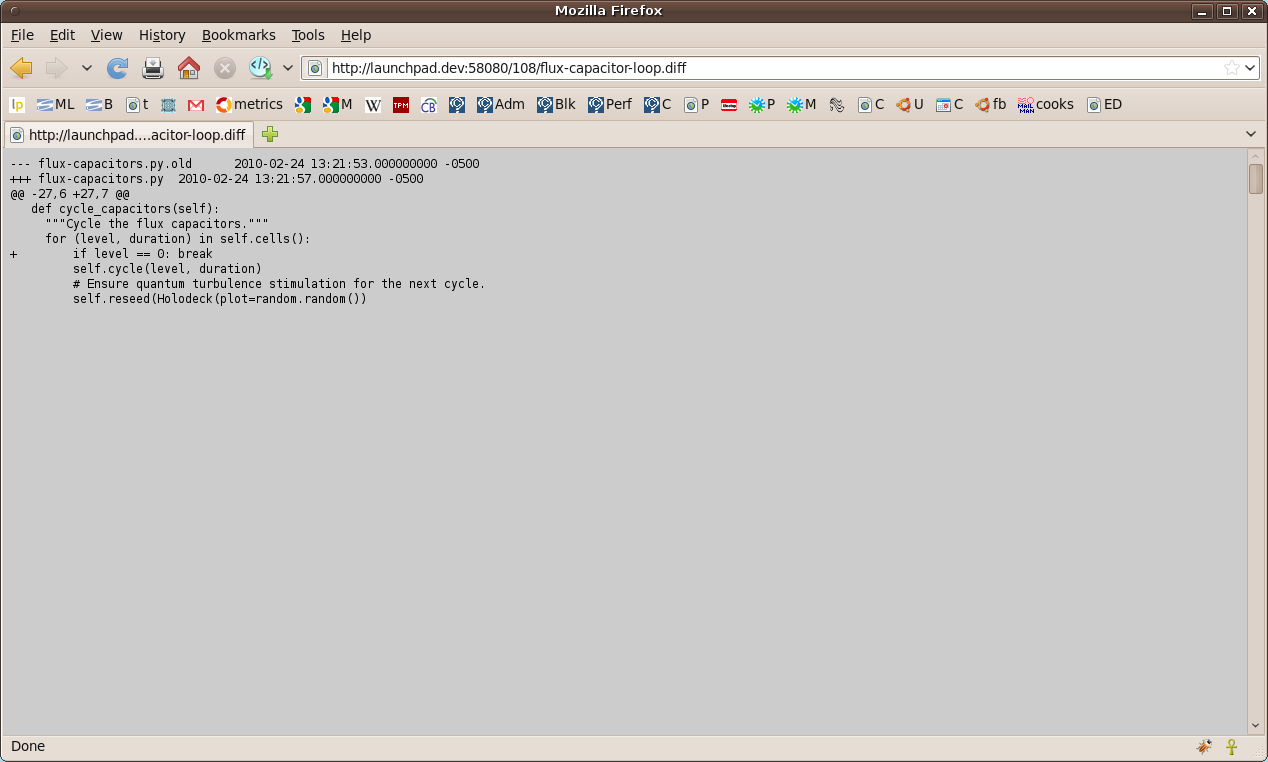
Naturally, clicking on a patch takes you straight to the diff:
We’re hoping that these features, combined with the recently-landed patch notification improvements and bug heat, will make it easier to find the patches worth immediate attention.
These patch reports are new in Launchpad 10.02. About a month after they go live, we’re going to look at the stats on how people have been using them, and we’re going to survey some upstreams and Ubuntu maintainers to see what they feel can be improved. Please also file bug reports as you use these new features, of course (if you feel like going the extra mile, tag your bug report with the patch-tracking tag — it’ll save us some time).
Finally, please feel free to help improve the features yourself! The bug links below will lead you to the branches on which these changes were made, so you can see what the code looks like. The Launchpad development wiki is the place to start for hacking on Launchpad.
References:
-
The Bugs/PatchTracking page in the Launchpad Development Wiki
-
Bug #283097 is about adding a ‘has patch’ column to the +packagebugs page.
-
Bug #283941 is about showing patches in the upstream report (see linked branch for code change).
-
Bugs tagged with story-patch-report are about the patch report (again, see linked branches for code changes).
Things we didn’t get to this cycle, but that we’re thinking about:
-
Finding patches in other distributions (but see Daniel Holbach’s amazing Harvest tool).
-
Bug #515674 is about showing the patches a distribution is carrying in its packages (i.e., in its debian/patches directories). Note in particular comment #4 there, about UI complexity.
-
Showing patches in upstream trackers. Such patches might be downstreamable, or they might be the same as patches Launchpad already has; either way, it’d be good to know. See bug #403443.
-
Package ↔ Branch equivalence. Really, a branch attached to a bug is equivalent to a patch attached to a bug (assuming the base source can be easily located, which it often can be). Ideally, we could represent either one as the other, and treat them as the same in filters and reports.
-
Launchpad isn’t yet making use of the Debian DEP-3 Patch Tagging Guidelines metadata, which is also the standard in Ubuntu now.
-
In general, see bugs tagged with patch-tracking and patch-tracking-external.
CORRECTION: Launchpad read-only 23.00 UTC Wed 3rd March – 00.30 UTC Thu 4th March, 2010
Published by kfogel March 1, 2010 in General
(This is a correction to a previous post.) Launchpad’s web interface will be read-only for roughly 90 minutes, from 23.00 UTC Wednesday 3rd March to 00.30 UTC Thursday 4th March, 2010. Other aspects of Launchpad — including code hosting, PPAs, the API and email interface — will be unavailable during that time.
Starts: 23.00 UTC, Wednesday 3rd March 2010
Expected back: 00.30 UTC, Thursday 4th March 2010
During this time, we’ll be releasing the code for Launchpad 10.02.
The next planned down-time for Launchpad will be for our 10.03 release on the 31st of March. We’ll publish the exact time, nearer to the release date, on our status page.
You can also see the Launchpad release calendar to check for future release down-time.
Launchpad read-only (corrected; see new post)
Published by kfogel in Notifications
This post has been corrected; please see the new post.
Meet Jelmer Vernooij
Published by Matthew Revell February 19, 2010 in Meet the devs
Jelmer Vernooij recently joined the Launchpad team at Canonical, so I caught up with him to give him the usual Meet the developers interview.
Matthew: What do you do on the Launchpad team?
Jelmer: I work in the Soyuz team, where I hack on the build system, package management and archive publishing in Launchpad.
Matthew: Can we see something in Launchpad that you’ve worked on?
Jelmer: Come to think of it, there aren’t yet a lot of visible things that I have worked on in Soyuz so far. However, some of the work that I did on Bazaar is indirectly visible in Launchpad. For example, the Git, Mercurial and (some) Subversion code imports are done through the foreign branch plugins, of which I am the main developer.
Matthew: Where do you work?
Jelmer: I work from home, and at at the moment that’s in Utrecht, a city with about 300k inhabitants in the center of the Netherlands.
Matthew: What can you see from your office window?
Jelmer: I look out over a canal and a small park in front of my apartment. It’s looking nice at the moment, covered in snow.
Matthew What did you do before working at Canonical?
Jelmer: Before joining Canonical I was working on my bachelors degree in Computer Science at the University of Utrecht. I also did part-time work for hacking on Windows software, small device firmware as well various free software projects.
Matthew: How did you get into free software?
Jelmer: In high school I used to help maintain several FreeBSD and Linux servers with Samba. We had a complex script that kept the Samba database in sync with the master database of students (in MySQL) and since this script kept falling over, I decided to add support to Samba to allow it to access our database directly.
Unfortunately the abstractions for Samba’s user database API needed some work and one thing led to another. Before I knew it, I was deep down in Samba development — almost ten years ago now.
Matthew: What’s more important? Principle or pragmatism?
Jelmer: They both have their place. Principles are important, but pragmatism might be necessary to get closer to a point where you can conform to your principles.
I’m certainly a free software pragmatist; I’ll use non-free software as long as there are no viable free software alternatives. The only non-free packages left on my system are skype (there just isn’t anything free that works as well) and the flash plugin for Mozilla (gnash isn’t there yet).
Matthew: Do you/have you contribute(d) to any free software projects?
Jelmer: When I can and where time permits I fix my pet bugs myself, so I’ve contributed a lot of small patches to a variety of projects.
Aside from that there are a few projects I work on on a regular basis. Samba was the first project I worked on and (apart from Launchpad) it still remains the project I spend most of my time on. I seem to have a thing for trying to figure out proprietary protocols — I’m also a developer on the OpenChange (Microsoft Exchange/Outlook) and BitlBee (MSN/AIM/ICQ) projects.
A couple of years ago I became interested in distributed version control systems and started playing with Bazaar. Since Samba was maintained in Subversion I started working on the bzr-svn plugin and later the bzr-git plugin so I could work on Samba with Bazaar, but I’ve also contributed to other areas of Bazaar.
For most of the projects I’m active in I’m also involved in the packaging for Debian and Ubuntu.
Matthew: Tell us something really cool about Launchpad that not enough people know about.
Jelmer: The upstream report gives a nice overview of the state of Ubuntu and how well upstream projects are tracked in Launchpad.
Matthew: Is there one developer who has been an inspiration to you? If so, why?
Jelmer: There are quite a few developers that have inspired me over the years.
I much appreciate the encouragement, mentoring and patience from Andrew Bartlett, Andrew Tridgell and Jerry Carter when I first started contributing to Samba. Without them I probably wouldn’t be involved in free software as much as I am today.
Pair-programming with Robert Collins and John Arbash Meinel during the first few Bazaar sprints taught me a lot about extreme programming and got me hooked on test driven development.
While I occasionally get annoyed by what seems like nitpicking in code reviews for Bazaar, I also realize that it’s great to get so much high-quality feedback. It has definitely made me a better programmer.
Matthew: Okay, Kiko’s special question! You’re at your computer, you reach for your wallet: what are you most likely to be doing?
Jelmer: I’m probably reaching for my credit card to pay for something online, most likely CDs or books.
Matthew: Thanks Jelmer!
Sikuli — scripting your use of GUIs
Published by Matthew Revell February 17, 2010 in Projects
![]()
The Sikuli project recently switched to using Launchpad. I asked Tsung-Hsiang Chang to tell me more about the project.
Matthew: Your website says, “Sikuli is a visual technology to search and automate graphical user interfaces (GUI) using images (screenshots).” That sounds like it’s a general purpose screen-scraping solution. Is that right?
Tsung-Hsiang: Not exactly. Sikuli is not about extracting data from screen.
The current release of Sikuli is called Sikuli Script, which focuses on only automation using screenshots of GUI widgets.
We have another project called Sikuli Search, which queries a search engine using screenshots instead of keywords.
Although Sikuli Script is supposed to be able to “search” buttons or text on the screen, it isn’t good at scraping or analyzing information from screenshots yet.
Matthew: In your YouTube demo video, you show how you can write a Sikuli script that will open an app by name. Then, you can take a screen shot of one of the icons in that app and have Sikuli click it as part of the script. You even show how you just have to take a screen shot of the option you want from a drop-down list and Sikuli will select that option. That’s really cool but you say that Sikuli will even tolerate small changes in the icons you ask it to click. How does that work?
Tsung-Hsiang: Matching between a target image and the screen image is done by computing the normalized cross-correlation between the two images.
This is a standard technique in computer vision for finding patterns when variations are known to be small. This technique works incredibly well for matching desktop GUI patterns.
Matthew: Where do you think Sikuli will be most useful?
Tsung-Hsiang: Whenever the internal API of an application is not exposed. Lots of people have created their scripts to play the applications that were used to be very difficult to be automated, such as facebook (flash) games and testing android systems.
Matthew: Particularly on Mac OS X and Linux-based systems, where does Sikuli become a better option than standard shell scripting?
Tsung-Hsiang: If a command line interface is available, Sikuli may be not a good choice for a shell scripting guru. But sometimes you just can’t find command line tools or don’t want to learn complicated commands and parameters. In fact, the core of Sikuli is just a Jython library, so it can be mixed with other Python scripts or command line tools easily. Therefore, Sikuli can be an additional handy tool for command line gurus.
Besides, the primary goal of Sikuli is to help ordinary users who know nothing about command line tools and shell scripting to automate their tasks. We hope everyone can enjoy using computer efficiently.
Matthew: What’s next for Sikuli?
Tsung-Hsiang:Better, faster, more accurate.
We have a long list of planned improvements for Sikuli. Among the top of list are:
- Social programming: the ability to share scripts and search scripts by visual patterns. For example, when a user takes a screen shot of a recycle bin, the user can search a database for all the other scripts written by other users that involve the image of a recycle bin.
- Event-driven programming: the ability to register event handlers to handle visual events. For example, a user can define a function to pop up a warning message to handle the visual event that involves the appearance of the “low battery image”.
- Face detection: the ability to find faces on the screen.
- Recorder: the ability to record a sequence of clicking and typing operations and generate a visual script automatically.
- Tutorial converter: the ability to convert an existing step-by-step instruction with screenshots into executable scripts.
Matthew: Why did you choose Launchpad?
Tsung-Hsiang:We were using Trac before moving to Launchpad. Trac is more developer-oriented, just like Github.
But what we really want is a user-oriented project hosting site. We want a place to report and discuss bugs, ask and answer questions, and also download and track the development of Sikuli.
We compared Github and Launchpad, and at last chose Launchpad over Github because Launchpad has almost everything we need, except a wiki for writing documents. But we already had a wiki in our Trac system, so this was not a big problem.
Matthew: Do you have any requests for the Launchpad community?
Tsung-Hsiang: It would be great if we can write documents on Launchpad. A wiki or something like EtherPad would be fantastic.
Matthew: Thanks very much and good luck with Sikuli!
Launchpad blog round-up
Published by Matthew Revell February 15, 2010 in General
Just a quick note to link to some interesting Launchpad-related posts/articles that have cropped up over the past week or so:
- An introduction to collaborative development with Launchpad — (Ars Technica)
- Some thoughts on using the Windmill testing framework in Launchpad development — (Björn Tillenius, via Planet Launchpad)
- Three tips for enhanced productivity — (Julian Edwards, via Planet Launchpad)
If you haven’t seen it yet, take a look at Planet Launchpad.
Report on Launchpad down-time of 4th Feb 2010
Published by Matthew Revell February 5, 2010 in General
If you visited Launchpad between 13.30 and 15.30 UTC yesterday (4th Feb), you’ll have seen that Launchpad was largely unavailable.
Since then, I’ve spoken to quite a few people who use Launchpad regularly and I want to say thanks to everyone for your patience while we fixed the problem. As we all use Launchpad for our own development, we know just how painful unplanned down-time is and we’re sorry for the disruption to your work.
I’d like to explain what happened, how we fixed the problem and what we’re doing to avoid a similar situation in future.
As you’d probably expect, we run more than one database server for Launchpad. There are two master databases and then slaves, which are copies of the masters. The master databases replicate constantly to the slaves.
When Launchpad makes a read-only request, such as fetching the title and description of a bug report, we can reduce the load on the master databases by fetching that data from one of the slaves. However, to ensure the data you see is up to date, each time Launchpad is about to fetch data from the slave database, it checks how long it has been since the last replication from the relevant master database. If, for whatever reason, the replication wasn’t recent enough, Launchpad will instead grab the data from the master database.
Yesterday, it was this check that was taking far longer than expected and so causing the problems that you may have seen. We were able to implement a temporary fix, to bring Launchpad back online, by directing all database queries straight to the correct master.
In the longer-term, we’re going to overhaul the way that Launchpad checks the freshness of the data in the slave databases. Rather than checking each time a query is made, Launchpad will check once every so often and cache the result, meaning that this problem shouldn’t arise again.
Thanks again for your patience.
Getting your code into Launchpad
Published by Matthew Revell January 29, 2010 in General
Brad has written a great guide to writing and committing your first code for Launchpad.
Amongst other things, he has a useful bullet list that describes the steps between deciding you want to write code for Launchpad and actually seeing your work in place.
“The steps for fixing a bug or adding a new feature in Launchpad are:
- Find a bug or feature request. The best place to look is on the milestone for the application of interest. (See the list for Launchpad Registry’s 10.02 milestone).
- Research the problem.
- Have a pre-implemention call.
- Grab the latest branch of Launchpad (which we informally call ‘rocketfuel’). You can use ‘rocketfuel-get’ to update your copy of devel and ‘rocketfuel-branch’ to make a branch for your work. It’s best to create a new branch for each chunk of work you do.
- Write your tests, write the code, repeat. (Read about TDD.)
- Push your code to Launchpad (‘bzr push’).
- Create a merge proposal (‘bzr send’).
- Have a review, fix changes, repeat.
- Run the tests. At a minimum you should run all the tests for the application you changed. For bugs you can do that with ‘bin/test -vvm lp.bugs’.
- Submit to PQM.
- QA the change when it lands on edge or staging.
- See the change in production when the next release rolls out.
- Bask in your awesomeness.”
If you want to fix a bug or get a feature into Launchpad, go read Brad’s post.
Feeling the heat
Published by Matthew Revell January 27, 2010 in Bug Tracking
 Ascertaining the importance of a bug can be one of the harder parts of bug triage, right?
It’s no problem if the project’s relatively small and you’re intimately involved with each bug but if you’re helping to triage for a larger project, it’s not always that easy.
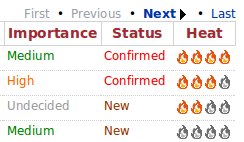
To help, we’ve introduced a new indicator of how hot a particular bug is. A bug’s heat is a calculated estimate of its importance, using factors such as how many people are subscribed, whether it’s a security issue, how many people have marked the bug as affecting them, and so on. Note that it is not a replacement for the bug’s human-set importance but rather an aid to the people deciding what the importance should be.
You can see the full details of how bug heat is calculated on our wiki page.
A bug’s heat is shown on the bug report page as four flame icons. The hotter the bug, the more of the icons are lit. You can also sort bug search results by bug heat.

There’s a bug at the moment that means there’s a fairly high barrier for a bug report to jump before any of its flames light up but take a look at the Ubuntu bug list, sorted by bug heat, and you’ll see the new bug heat icons in action.
Let us know how you’d like to use bug heat.
Improved Bug Patch Notifications
Published by Deryck Hodge in Bug Tracking
There are a couple of new features related to patch handling in Launchpad bugs this month.
Building on the work we did in December to better distinguish patches in bug pages, we now use an icon to show if a bug has a patch attached in bug listings. Any search on Launchpad will now indicate if a bug has a patch attached. Look for the band aid icons, and you’ll know that a bug has a patch attached.
Also, bug mail notifications have been updated to distinguish patches from any other attachment. Now when a patch is added or removed from a bug the email notification will read “Patch added” or “Patch removed” to make spotting patches easier in email.
These are small improvements to our handling of patches to help patches become more easily spotted on Launchpad. Combined with our work on sorting bugs by a heat number, the Launchpad bugs app is doing more to let users know about the state and quality of a bug report.
